Psst...
If setting up artwork isn't your thing just send us your files and for a small fee we can sort it out...
SET UP YOUR ARTWORK FOR LABELS ON ROLLS


Die Lines
A die line serves as a template that ensures proper layout for a printed product. It is a diagram that shows all the cut lines and folds in a flattened form. Die lines play a vital role in the die-cutting process. A die line indicates where the machine should cut or score on your print. Think of it as a blueprint.
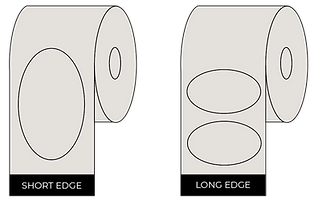
Orientation. What is it? Why it's important.
Label orientation or unwind direction as it is also referred to, is simply the way in which the label unwinds from a roll. It is a simple thing, although it can be confusing if you are not familiar with labels. Knowing exactly what roll direction you want comes in handy when producing your artwork and ordering labels as it may affect the efficiency or the ease of machine application of your label being placed on your product.
Short edge and long edge refers to the orientation of the label template on the roll.
Left edge first means the left will be dispensed first.
Foot first refers to the bottom of the label being dispensed first.
It is vital to check that the roll direction coincides with the roll direction you want. Be sure that the initial roll direction is the right one, as it is often too late to change the roll direction once the production has begun.


Let's step you through it
Setting up your artwork
for labels on rolls - Set up
01.
Firstly set up your artboard or document to its finished size with 2mm bleed and no trim marks.

Setting up your artwork
for labels on rolls - Spot colour
02.
Then you need to create your die line swatch colour by clicking the menu icon within the Swatches palette and selecting New Swatch.
To set up the Die Line Spot Colour:
Set the Swatch Name to Die Line
Set the Colour Type to Spot Colour
Set the Colour Mode to CMYK
Set C, Y and M to 0% and K to 100%
Click OK.
03.
This colour will now appear in the swatch palette.
Add the Die Line Spot Colour as a stroke to what you would like to be cut out. NOTE: A die line should be a stroke, it should not be outlined or expanded.
04.
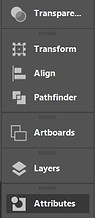
Once the path is set to Die Cut, open Attributes, which if it is not on your panel interface can be found under the Window menu. Select the path which is set to die line and set it to Overprint Stroke.

create new Swatch Colour
Die Line
Spot Colour
CMYK
C 0%
M 0%
Y 0%
K 100%


100% Die Line
Overprint Stroke


Selection
Setting up your artwork for labels on rolls
- New Layer
05.
Next, put it on a separate layer.
This can be done by;
Opening Layers, which if it is not on your panel interface can be found under the Window menu.
Create a new layer by clicking the + within the box. Double click the layer to rename it to Die Line.


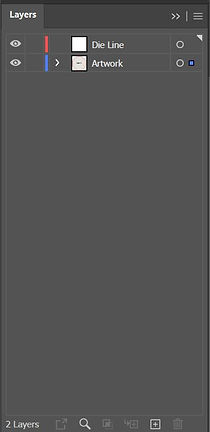
Double click to rename Die Line
06.
Select the path that is set to the Die Line colour, and select the Die Line layer within the tab.
Right click the path , then move the mouse over Arrange, then click Send to Current Layer.
This will send the path to the Die Line Layer, you will notice if this has worked as the colour of the outer ring when the object is selected has changed colour.


Select Die Line Layer
Setting up your artwork for labels on rolls
- Saving your artwork
07.
Please ensure when saving your work you include “AL230” and the end of your file name so we know it is set up for the label press.


Your print ready
artwork should
look like this